Python
多个conda环境的 Jupyter lab 配置
1 | conda activate envName |
conda 基本操作
1 | conda create -n name python=version # version为3.6 / 2.7等版本号 |
Conda 去除终端显示的环境名
由于使用了spaceship作为zsh的主题,所以conda原生现实的环境名有点多余,使用以下命令关闭显示
conda config --set changeps1 false
多环境pip安装包
直接到想要安装包的环境的/bin下,运行
1 | ./python pip install packagename |
暂时切换默认Python为/usr/bin/python而不是~/anconda3/bin/python
注释掉.zshrc(.bashrc)中conda init部分
或者将export PATH="/home/user/anaconda3/bin:$PATH"改为export PATH="$PATH:/home/user/anaconda3/bin"(好像没用?)
使得系统默认的Python先被找到
pip换源
1 | 临时切换 |
ArchLinux
系统
搜狗拼音占用过高CPU
fcitx -r
垃圾文件无法删除
直接进入到trash对应的实际目录~/.local/share/Trash中进行删除即可(注意大小写)
Deepin-wine
设置特定软件DPI等等
WINEPREFIX=~/.deepinwine/Deepin-TIM deepin-wine winecfg
prefix换成特定的软件位置
解压出现中文乱码
使用unar即可
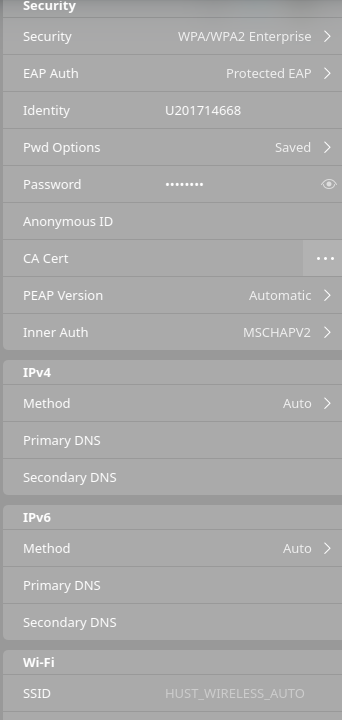
HUST_WIRELESS_AUTO
修改/etc/NetworkManager/system-connections/中对应的WiFi名称,在security添加auth-alg=open
安装WPS之后mime混乱
删除mime文件,更新mime
1 | sudo rm /usr/share/mime/packages/wps* # 删除所有wps的.xml文件 |
Word文档粘贴图片乱跑
全文改为单倍行距
Java 版本管理
使用archlinux-java命令进行管理
VirtualBox两个虚拟机Ip相同
主要是在大数据导论课程中需要在虚拟机中运行
spark所以就需要两个slave,并且要求ip不同
在命令行中输入以下
VBoxManage modifyvm "SparkSlave1" --natnet1 "10.14.126.33"
VBoxManage modifyvm "SparkSlave2" --natnet1 "10.14.126.34"
其中natnet1的参数为所要设置的ip地址
Albert Calculator插件无法使用
安装muparser之后重新安装albert
顺便推荐一波
Albert
LInux 下matlab语言设置
由于matlab在Linux下是通过LANG环境变量来决定语言的,而不像其他操作系统中直接通过preference提供了设置的选项,所以只需要在启动的时候export相应的环境变量值即可,如
1 | export LANG=en_US.UTF-8; {MATLAB}/bin/matlab |
安装 Conda后无法安装pycharm
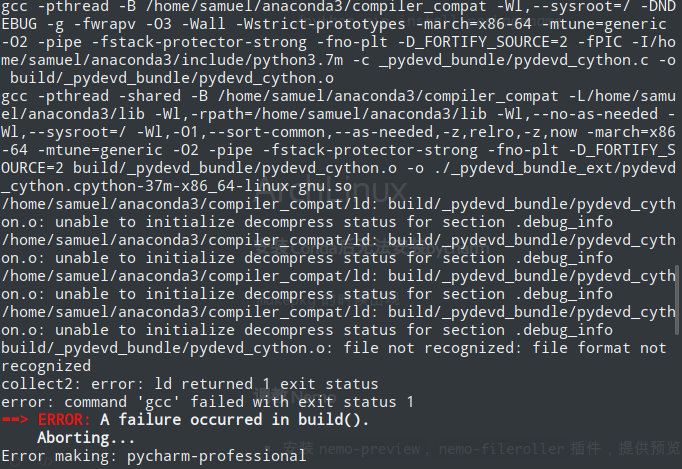
makepkg的时候出现

由于PKGBUILD文件中写的是python3,默认使用的conda中的python3
将build() 中的 /usr/bin/python3 helpers/pydev/setup_cython.py build_ext --build-temp build --build-lib .的python3改为/usr/bin/python3即可
后来发现可能是
conda安装之后修改了PATH导致首选链接库变成了conda的,更简单的解决方法就是将.zshrc中conda初始化的部分注释掉,重启shell,然后再安装pycharm
调教 Nemo
安装
nemo-preview,nemo-fileroller插件,提供预览和 解/压缩 的功能通过在
~/.local/share/nemo/actions编写.nemo_action文件来扩充右键菜单code.nemo_action1
2
3
4
5
6
7[Nemo Action]
Name=Open in Code
Comment=open current path in visual studio code
Exec=code %P
Selection=None
Extensions=any;
Icon-Name=notebook
code_folder.nemo_action
1 | [Nemo Action] |
注意:Icon-Name 可以在安装的各种Icon-theme所在文件夹(我的在/usr/share/icons/Numix/scalable/actions)中找到action文件夹,使用其中的图标(去掉拓展名)
而在~/.local/share/nemo/actions,点击出现的提示More Info 会打开.nemo_action文件的基本编写文档
添加开机自启动任务
在/etc/systemd/system中添加rc-local.service内容为
1 | [Unit] |
然后编写/etc/rc.local, 记得要加上#!/bin/bash否则会出现format错误导致无法执行,似乎也要添加执行权限chmod u+x /etc/rc.local
1 |
|
然后在系统服务中添加rc-local.service
这一项原本是为了解决 pcspkr模块所带来的beep的声音,但是使用了各种方法都不行,最后用这种办法解决了,就是在
/etc/rc.local中添加sudo rmmod pcspkr语句,开机执行
一般的想要自启动软件可以简单的将/usr/share/applications/autostart_application.desktop复制到~/.config/autostart文件夹即可,有时候使用软件提供的开机自启动选项并不好使
Wallpaper
默认的用户添加的wallpaper需要放在.cinnamon/background
好像没有什么卵用
字体
添加完字体之后fc-cache -fv刷新字体缓存(或者使用fc-cache -rv 强制刷新)
解决终端无法正常显示表情(gitmoji)
在google-noto-font 下载Noto Color Emoji安装即可
解决Typora中的emoji表情为黑白
安装EmojiOne字体
yay -S ttf-emojione
修改typora默认字体~/.config/Typora/conf/conf.user.json
将standard字体改为EmojiOne
重启Typora,即可正常显示彩色表情
注意不要把四个(
standard,serif,sanSerif, ‘monospace’)全部改了,似乎某一更改之后会导致源码模式下左侧的行数也变为表情。
上述方法失败,由于aur中移除了ttf-emojione
安装ttf-joypixels之后将字体更改为Noto Color Emoji即可
Manjaro-deepin中文乱码
安装字体sudo pacman -S wqy-microhei
硬件
glxinfo -B
获得3D hardware信息,可以查看当前使用的显卡等等
安装inxi来获得所有硬件信息
xrandr --listproviders
check the list of attached graphic drivers:
glxinfo | grep "OpenGL renderer"
Git
解决git add等命令的中文乱码
终端输入 git config --global core.quotepath false
原理:
Commands that output paths (e.g. ls-files, diff), will quote “unusual” characters in the pathname by enclosing the pathname in double-quotes and escaping those characters with backslashes in the same way C escapes control characters (e.g.
\tfor TAB,\nfor LF,\\for backslash) or bytes with values larger than 0x80 (e.g. octal\302\265for “micro” in UTF-8). If this variable is set to false, bytes higher than 0x80 are not considered “unusual” any more. Double-quotes, backslash and control characters are always escaped regardless of the setting of this variable. A simple space character is not considered “unusual”. Many commands can output pathnames completely verbatim using the-zoption. The default value is true.
摘自git-scm
解决.gitignore文件修改后git继续跟踪更改
如果项目一开始的时候就没有.gitignore文件的话,那么一旦git对文件进行跟踪,再添加到.gitinore就没有效果了
1 | git rm --cached <path to file> |
如果是文件夹的话加上-r参数
可以使用git check-ignore来检查.gitignore文件的编写是否正确
解决git clone速度慢
挂代理
git config --global http(s).proxy xxxxx我也不知道叫什么,但是的确有效
git config --global http.postBuffer 524288000
用
git config --global -l查看当前git配置
fork之后想要更新
1 | git remote add upstream https://github.com/[Original Owner Username]/[Original Repository].git |
使用submodule在子模块自己的仓库中提交了commit,更新主仓库
1 | # 在主仓库中执行 |
解决git clone 需要输入密码
似乎是因为最近的更新,如果是已经克隆的仓库,请在.git/config中,将url一项,由http改为ssh
1 | https://github.com/WEMP/project-slideshow.git |
Sublime
安装Package Control,解决中文乱码问题
- 输入命令安装
- 下载后放到指定的位置
Ctrl + Shift + P 打开命令窗口
输入install, 选择Package Control: Install Package
输入ConvertToUTF8
安装后可能打开文件的时候会提示你要安装一个叫做
codecs33的包,安装就好了,然后可能第一次安装包管理器的时候,更新特别慢 ==> Preferences: Package Control sublime Settings - User ==> 添加一行”channels”字段:
1 | "channels": |
Qt
解决GTK桌面下Qt程序一些细节无法正常显示的问题
对于qt4
/usr/bin/qtconfig-qt4 选择GTK+
对于qt5
在/etc/environment中添加 QT_QPA_PLATFORMTHEME=gtk2
npm
nvm install 慢
export NVM_NODEJS_ORG_MIRROR=http://npm.taobao.org/mirrors/node
安装electron慢
export ELECTRON_MIRROR=https://cdn.npm.taobao.org/dist/electron/
VSCode
Go
更新插件失败
- 根据此代理的说明进行配置
- vscode的设置中找到
Go: Use Go Proxy To Check For Tool Updates,勾选 - 按下F1,输入
Go: Install\Update tools,全选,确认,手动更新 - 可能需要重启一遍vscode
Mac
NTFS文件系统读写
使用第三方软件Mounty来对NTFS文件系统进行读写,提示卷不能在读/写模式下重新挂载。可能是因为先前没有完全卸载(安全删除)。
根据这篇博客,将硬盘插入window系统中,在命令行中运行以下命令
1 | # 假设挂载后硬盘的盘符为E |
进行磁盘检查。运行结束后,在Windows右下角点击“安全弹出硬盘xxx”即可
不知道什么原因触发了bug,似乎是删除了好几个文件,然后访达直接卡死,之后整个系统直接卡死,只好强制关机
而硬盘不出所料损坏,插入Windows后进行自动修复后恢复正常